In the realm of graphic design, Photoshop stands as an industry-leading software, empowering creatives with its versatile tools and endless possibilities. When it comes to designing flyers, understanding the significance of the correct flyer template size is paramount. This guide delves into the intricacies of Flyer Template Size Photoshop, providing a comprehensive overview, practical guidance, and answers to frequently asked questions.
From exploring standard flyer template sizes to customizing your own, this guide navigates the nuances of Photoshop’s capabilities. Discover the factors to consider when selecting a template size, learn how to create custom sizes, and delve into the art of designing compelling flyers using Photoshop’s templates. Additionally, we’ll shed light on exporting flyers in various formats, ensuring your creations are ready for print or digital distribution.
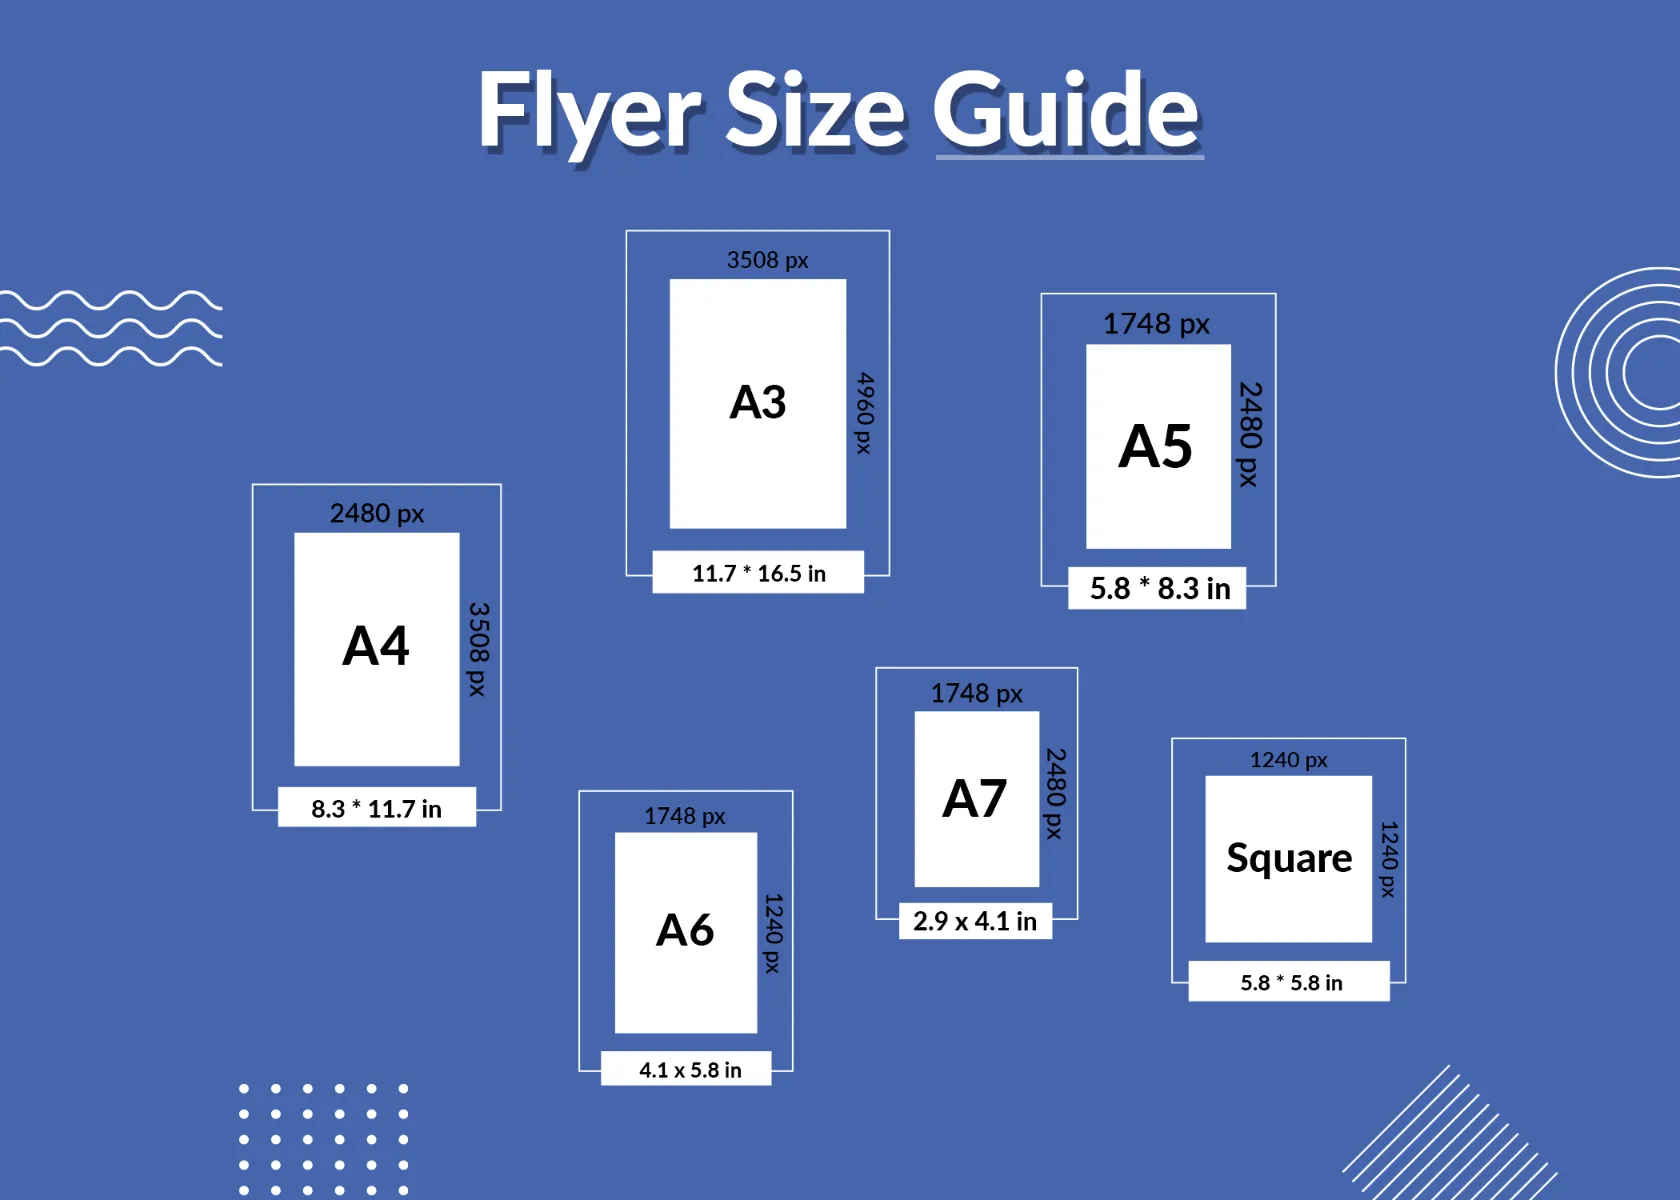
Overview of Flyer Template Size in Photoshop
Selecting the right flyer template size in Photoshop is crucial for creating effective and impactful flyers. The size determines the amount of information you can include, the overall visual appeal, and the distribution method.
Standard flyer template sizes vary depending on the intended purpose and distribution channels. Here’s a table with some common sizes and their recommended uses:
Standard Flyer Template Sizes
| Size | Recommended Use |
|---|---|
| 8.5 x 11 inches | Standard letter-sized flyers for general distribution, handouts, and mailers |
| 11 x 17 inches | Tabloid-sized flyers for eye-catching displays, posters, and large-scale events |
| 8.5 x 5.5 inches | Half-page flyers for direct mail campaigns, inserts in magazines, and trade shows |
| 5.5 x 8.5 inches | Rack cards for placement in display stands, countertops, and tourist information centers |
Factors to Consider When Choosing a Flyer Template Size
When selecting a flyer template size, consider the following factors:
- Target audience: Determine the size that will be most effective for reaching your intended audience.
- Distribution method: Consider the size restrictions for mailers, display stands, or other distribution channels.
- Content: Choose a size that provides enough space for all the necessary information without overcrowding the design.
- Visual impact: Larger sizes offer more space for eye-catching visuals and bold headlines.
- Budget: Printing costs can vary depending on the size of the flyer.
Customizing Flyer Template Size in Photoshop

Creating a custom flyer template size in Photoshop is a straightforward process that allows you to design flyers with specific dimensions tailored to your needs. Let’s dive into the steps involved:
Creating a Custom Flyer Template Size
1. Open Photoshop and click on “File” > “New” to launch the “New Document” dialog box.
2. In the “New Document” dialog box, under “Preset”, select “Custom”.
3. Enter the desired width and height for your flyer template in the respective fields.
4. Choose the unit of measurement from the dropdown menu (inches, centimeters, pixels, etc.).
5. Click “Create” to create a new document with the specified custom flyer template size.
Units of Measurement
Photoshop supports various units of measurement for flyer template size, including:
– Inches (in): Commonly used for print designs, where physical dimensions are measured in inches.
– Centimeters (cm): Metric unit often used in Europe and other regions.
– Pixels (px): Digital unit used for web and digital designs, where the size is determined by the number of pixels.
Conversion factors:
– 1 inch = 2.54 centimeters
– 1 centimeter = 0.3937 inches
– 1 pixel = 1/96 inch (for 72 dpi resolution)
Designing Flyers Using Photoshop Templates
Photoshop templates provide a quick and easy way to create professional-looking flyers. Here are some tips and techniques for using them effectively:
Tips and Techniques
– Start with a high-quality template. This will ensure that your flyer has a polished look.
– Use high-resolution images and graphics. This will help your flyer stand out and make it more visually appealing.
– Use layers and layer masks to create complex designs. This will give you more control over the look of your flyer and allow you to make changes easily.
– Experiment with different fonts and colors. This will help you create a flyer that is unique and reflects your brand.
– Proofread your flyer carefully before printing. This will help you catch any errors and ensure that your flyer is ready to go.
Importance of High-Quality Images and Graphics
High-quality images and graphics are essential for creating a flyer that is visually appealing and effective. They can help you to:
– Grab attention
– Convey your message
– Create a professional image
– Increase brand awareness
Using Layers and Layer Masks
Layers and layer masks are powerful tools that can help you to create complex designs in Photoshop. Layers allow you to organize your work and make changes easily. Layer masks allow you to hide or reveal parts of a layer, which can be useful for creating special effects.
Experimenting with Different Fonts and Colors
The fonts and colors you use on your flyer can have a big impact on its overall look and feel. Experiment with different combinations to find the ones that best suit your brand and message.
Proofreading Your Flyer
It is important to proofread your flyer carefully before printing. This will help you catch any errors and ensure that your flyer is ready to go. Check for spelling and grammar errors, as well as any formatting issues.
Exporting Flyers in Different Formats

Exporting flyers in various file formats allows for flexibility in usage, whether for print or digital distribution. Understanding the export settings and their impact on the final flyer’s quality is crucial.
To export your flyer in Photoshop, go to File > Export > Export As. Choose the desired file format from the dropdown menu.
File Formats
- PDF (Portable Document Format): A versatile format suitable for both print and web use. It preserves the flyer’s layout and design, making it ideal for sharing and printing.
- JPEG (Joint Photographic Experts Group): A commonly used image format that compresses the image to reduce file size. It is suitable for web use, but may result in some loss of image quality.
- PNG (Portable Network Graphics): A lossless image format that supports transparency. It is a good choice for web use, as it preserves the original image quality.
Export Settings
When exporting your flyer, pay attention to the following settings:
- Resolution: Measured in pixels per inch (PPI), the resolution determines the sharpness of the image. For print, a resolution of 300 PPI is recommended. For web use, 72 PPI is sufficient.
- Color Space: Choose the appropriate color space based on the intended use. CMYK is used for print, while RGB is used for web.
- Quality: For JPEG exports, adjust the quality slider to control the compression level. A higher quality setting results in a larger file size but better image quality.
Best Practices
To ensure optimal flyer quality:
- Save a High-Resolution Master: Keep a high-resolution PSD or TIFF file as a master copy for future editing or reprints.
- Use Appropriate Export Settings: Choose the correct file format and export settings based on the intended use.
- Proofread Carefully: Before exporting, thoroughly proofread the flyer for any errors in text or design.
FAQs
What are the standard flyer template sizes in Photoshop?
Photoshop offers a range of standard flyer template sizes, including 8.5×11 inches (US Letter), 11×17 inches (US Tabloid), and A4 (210×297 mm). Each size caters to specific purposes, such as brochures, posters, and invitations.
How do I create a custom flyer template size in Photoshop?
To create a custom flyer template size, go to “File” > “New” and enter the desired width and height in the “New Document” dialog box. You can choose from various units of measurement, including inches, centimeters, and pixels.
What factors should I consider when choosing a flyer template size?
When selecting a flyer template size, consider the purpose of the flyer, the distribution method (print or digital), and the target audience. The size should complement the content and ensure readability and visual impact.
How do I export a flyer in different formats from Photoshop?
To export a flyer in different formats, go to “File” > “Export” and select the desired format (e.g., PDF, JPEG, PNG). Adjust the export settings, such as resolution and color space, to optimize the flyer for its intended use.