In the world of document creation, efficiency is key. Microsoft Word’s templates offer a powerful solution to streamline your workflow and elevate the quality of your documents. This comprehensive guide will equip you with the knowledge and techniques to create professional-looking, reusable Word document templates that will transform your document creation process.
From the basics of template creation to advanced customization and automation, this guide covers everything you need to know to harness the full potential of Word document templates. Whether you’re a seasoned Word user or just starting out, you’ll find valuable insights and practical tips to make your document creation process faster, easier, and more effective.
Creating Basic Word Document Templates
Templates are a great way to save time and ensure consistency in your documents. They can be used for a variety of purposes, such as creating letters, resumes, presentations, and more.
To create a new template, open a new Word document and click on the “File” tab. Then, click on “New” and select “Template” from the list of options.
Naming and Organizing Templates
Once you have created a template, you will need to give it a name. The name should be descriptive and easy to remember. You will also need to decide where to save the template. It is a good idea to create a separate folder for your templates so that you can easily find them later.
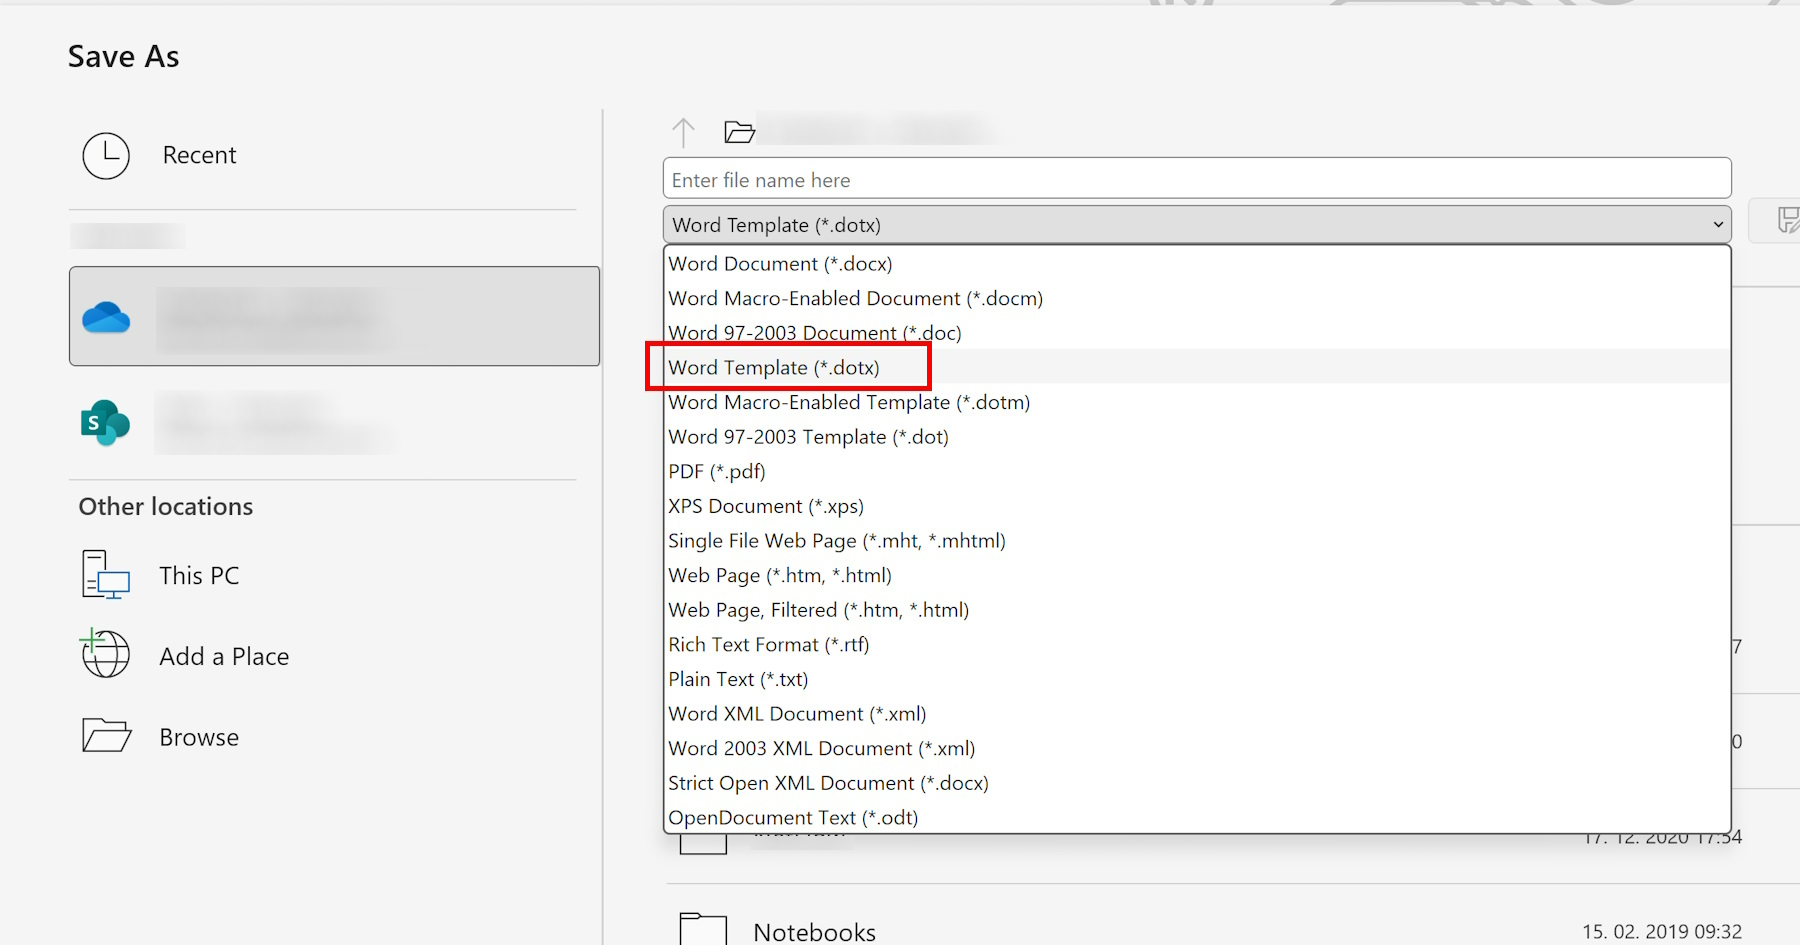
Creating a New Template
To create a new template, you will need to add the content that you want to appear in all of your documents. This can include text, images, and formatting. Once you have added the content, you can click on the “File” tab and select “Save As”. In the “Save As” dialog box, select “Word Template” from the “Save as type” drop-down menu.
Using Templates
To use a template, open a new Word document and click on the “File” tab. Then, click on “New” and select “From Template”. In the “New from Template” dialog box, select the template that you want to use and click on the “Open” button.
Tips for Using Templates
Here are a few tips for using templates:
* Use templates to save time and ensure consistency in your documents.
* Give your templates descriptive names so that you can easily find them later.
* Store your templates in a separate folder so that they are easy to organize.
* Update your templates regularly to ensure that they are up-to-date.
Customizing Templates with Headers, Footers, and Styles

Innit, customizing Word document templates is a breeze when you’ve got headers, footers, and styles on your side. Let’s dive right in, shall we?
Adding and Formatting Headers and Footers
Want to add a bit of pizazz to your docs? Headers and footers are your go-to. To add ’em, click the “Insert” tab, then “Header” or “Footer”. You’ll see a bunch of snazzy templates to choose from. Once you’ve picked one, you can start customizing it with text, images, or whatever floats your boat.
Creating and Applying Custom Styles
If you’re all about consistency, custom styles are your new best mates. To create one, select the text you want to style, click the “Home” tab, then the “Styles” drop-down. Click “New Style” and give it a name. You can then customize the font, size, color, and more. To apply the style, simply highlight the text and click on the style name.
Using Styles to Enhance Document Consistency
Styles are like magic wands for making your docs look slick and professional. By using consistent styles for headings, text, and lists, you can ensure that all your documents have the same look and feel. It’s like having a personal style guide built right into Word.
Inserting Dynamic Content and Automation
:max_bytes(150000):strip_icc()/001-how-to-create-and-use-microsoft-word-templates-7763473face04dbaa26f9427f483dbb4.jpg?w=700 "How To Create Word Document Templates terbaru")
Word document templates can be customized to include dynamic content that changes based on the information entered. This allows for the creation of personalized documents that are tailored to specific needs.
Placeholders for Dynamic Content
Placeholders can be inserted into templates to indicate where dynamic content should be inserted. These placeholders are represented by special characters or codes, such as:
- DATE: Inserts the current date.
- TIME: Inserts the current time.
- USERNAME: Inserts the name of the user who created the document.
To insert a placeholder, simply type the appropriate code into the template.
Macros and VBA Code
Macros and VBA (Visual Basic for Applications) code can be used to automate tasks within templates. This allows for the creation of more complex and sophisticated templates.
- Macros: Macros are small programs that can be recorded and played back to perform repetitive tasks. They can be created using the built-in macro recorder in Word.
- VBA Code: VBA code is a more powerful programming language that can be used to create custom functions and procedures for templates.
Macros and VBA code can be used to automate a wide variety of tasks, such as:
- Inserting and formatting text
- Creating tables and charts
- Performing calculations
- Generating reports
Advantages and Considerations of Automation
Using automation in templates offers several advantages, including:
- Increased efficiency: Automation can save time by automating repetitive tasks.
- Improved accuracy: Automation can help to reduce errors by eliminating the need for manual input.
- Enhanced customization: Automation allows for the creation of more customized and tailored templates.
However, there are also some considerations to keep in mind when using automation:
- Complexity: Macros and VBA code can be complex to create and maintain.
- Security: Macros and VBA code can pose a security risk if they are not properly written and tested.
- Compatibility: Macros and VBA code may not be compatible with all versions of Word.
Overall, automation can be a powerful tool for creating more efficient and customized Word document templates. However, it is important to carefully consider the advantages and considerations before using automation in templates.
Sharing and Collaborating on Templates
Sharing and collaborating on templates is essential for streamlining document creation and ensuring consistency within an organization.
There are several ways to share templates:
- Email: Send the template as an email attachment.
- Shared Drive: Store the template on a shared drive accessible to authorized users.
- Template Gallery: Some organizations have a centralized template gallery where users can access and download templates.
Collaborating on templates offers several benefits:
- Improved Consistency: Ensures that all users are using the same templates and formatting.
- Reduced Errors: Templates reduce the risk of errors by providing pre-defined content and formatting.
- Increased Efficiency: Templates save time by eliminating the need to recreate documents from scratch.
However, collaborating on templates also presents some challenges:
- Version Control: Managing multiple versions of templates can be challenging.
- Access Control: Ensuring that only authorized users have access to templates is important.
- Updates: Keeping templates up-to-date with the latest changes can be time-consuming.
To effectively manage and update shared templates, it’s important to establish clear guidelines and processes:
- Version Control: Use version control systems to track changes and manage multiple versions of templates.
- Access Control: Define roles and permissions to control who can access, edit, and share templates.
- Regular Updates: Regularly review and update templates to ensure they remain current and relevant.
Advanced Techniques for Template Creation
Creating complex and sophisticated Word document templates requires advanced techniques. These techniques enable you to create multi-page templates with different sections and layouts, apply conditional formatting to customize the appearance of your template based on specific criteria, and use advanced features like XML mapping and content controls to automate document creation.
Creating Multi-Page Templates with Different Sections and Layouts
Multi-page templates allow you to create documents with multiple pages, each with its own unique layout and content. To create a multi-page template, you can use the “Page Setup” dialog box to add new pages and specify the layout for each page. You can also use section breaks to divide your template into different sections, each with its own header, footer, and page numbering.
Using Conditional Formatting to Apply Rules and Styles
Conditional formatting allows you to apply rules and styles to your template based on specific criteria. For example, you can use conditional formatting to highlight rows in a table that meet certain conditions, or to change the font color of text based on its value. Conditional formatting is a powerful tool that can help you to create templates that are both visually appealing and easy to use.
Using Advanced Features: XML Mapping and Content Controls
XML mapping and content controls are advanced features that can be used to automate document creation. XML mapping allows you to link data from an XML file to your template, so that the template can be automatically populated with data. Content controls allow you to create interactive elements in your template, such as drop-down lists, check boxes, and text boxes. These elements can be used to collect user input and to control the flow of information in your document.
FAQ
Can I create templates from existing Word documents?
Yes, you can easily create a template from an existing Word document by saving it as a template file (.dotx). This allows you to preserve the formatting, styles, and content of your document as a reusable template.
How do I share templates with others?
You can share templates with others by saving them to a shared network drive or using cloud storage services like OneDrive or Google Drive. Alternatively, you can email the template file directly to your colleagues.
Can I protect my templates from unauthorized changes?
Yes, you can protect your templates by setting permissions and restricting editing rights. When saving your template, you can choose to make it read-only or password-protected to prevent unauthorized modifications.